

 Français
 What Is Bud Washing?
Cannabis industry professionals and consumers alike often overlook the importance of bud washing; however, its practice is becoming increasingly popular for good reason. This simple procedure of immersing cannabis in water post-harvest helps to remove dust, dirt, microbes and other potential contaminants from your flower.
Bud washing is especially important for large and small scale commercial operations where maintaining a high level of quality control and producing safe flowers is essential.
Is Bud Washing Counterproductive?
Many people consider washing their cannabis flowers counter-productive, as they are often covered in precious cannabinoids and terpenes. In general, it is thought that washing these buds could dislodge the trichomes, leading to a loss in potency and flavor. However, while these concerns exist and should be accounted for, washing your weed will not impact its effects.
Cannabinoids such as THC and CBD hold a fat-soluble feature and also happen to be hydrophobic; this means that there would be no losses during the rinsing process. On top of this security reason, different terpenes that bring about those unique fruity or floral aromas stay within the resin— only if conducted carefully will you keep them intact.
So, when done mindfully, it may be productive to wash your weed in order to get rid of any debris or contaminants that have made it through the cultivation process.
The Pros and Cons of Bud Washing
Bud washing, also known as cannabis washing or marijuana washing, is the process of cleaning the harvested cannabis buds to remove dust, dirt, insect debris, and other impurities that may have accumulated during the growth and harvesting stages. As with any method, there are pros and cons to consider when deciding whether to use bud washing for your cannabis plants.
Pros:
- Improved cleanliness: Bud washing can remove impurities such as dirt, dust, mold spores, and other contaminants, resulting in cleaner and healthier cannabis buds for consumption.
- Enhanced taste and aroma: Removing impurities can lead to improved taste and aroma in the final product, as the natural flavors and terpenes of the cannabis are not masked or altered by contaminants.
- Reduced risk of mold and mildew: By washing away mold spores and other potential pathogens, the risk of mold and mildew growth during the curing process is minimized.
- Pest control: Washing buds can help remove pests and their eggs, as well as the remains of insects that may have been present on the plant during growth.
- Increased consumer satisfaction: A cleaner product can lead to increased consumer satisfaction, as the product is perceived as being of higher quality and potentially safer to use.
Cons:
- Risk of over-handling: Excessive handling of cannabis buds during the washing process can potentially damage the delicate trichomes, leading to a loss of potency and overall quality.
- Potential for water damage: If buds are not properly dried after washing, there is a risk of water damage, which can lead to mold or mildew growth and a compromised final product.
- Time-consuming: The process of washing and then thoroughly drying cannabis buds can be time-consuming, adding extra steps to the post-harvest process.
- Loss of trichomes: Washing buds can result in the loss of some trichomes (the tiny, crystal-like structures on cannabis buds that contain cannabinoids and terpenes), potentially reducing the potency and overall quality of the final product.
- Controversial effectiveness: Some indoor growers argue that proper growing techniques, pest management, and harvest methods can minimize the need for bud washing, and that the potential risks outweigh the benefits.
Bud Washing: What Solutions to Use?
Lemon and baking soda are a great natural solution for bud washing. With the acidity of the lemon combined with the alkalinity of the baking soda, you can effectively cleanse your flowers and remove dirt or residue without any synthetic chemicals.
The cleaning power of this duo is strong enough to scrub down surfaces but gentle enough to not damage delicate cannabis buds. Plus, it helps to naturally deodorize spills, making it a great all-natural option for outdoor growers who want only the best for their plants.
How to Wash Your Buds
Now that you understand the advantages and potential drawbacks of bud washing, as well as some of the popular solutions used in the bud washing process, let's dive into a step-by-step guide on how to effectively clean your buds. This will help you remove any debris and fully appreciate their authentic flavors.
Equipment
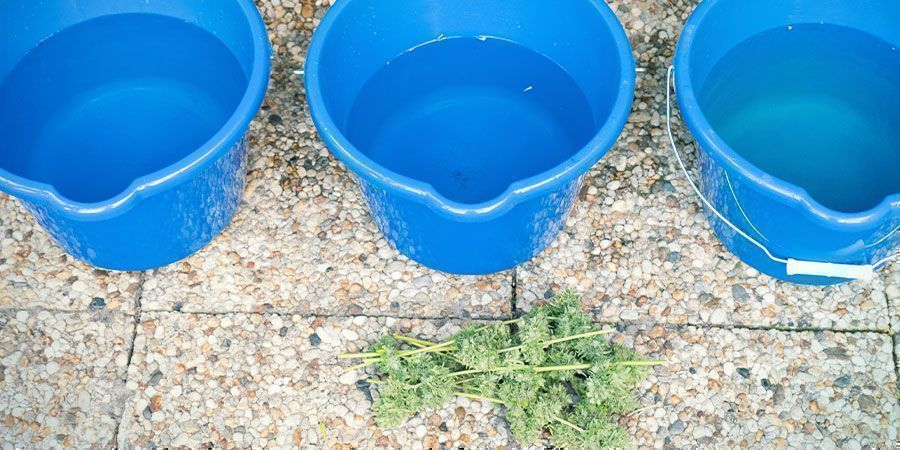
This list of equipment contains the essential items needed for making a basic homemade cleaner. Three clean 5-gallon (19-litre) buckets are necessary, as they will be used to store the cleaning solution. Twelve gallons (45 litres) of room temperature water should also be prepared.
Ideally, this water should be reverse osmosis filtered so that impurities have been removed and won’t contaminate the cleaning product. Finally, ¼ cup each of lemon juice and baking soda will act as natural disinfectants and provide a light citrus-like smell.
Step 1: Set Up Your Production Line
The first step when setting up a production line is to get the buckets ready. Buckets should be placed in a line so that each station can easily follow the last one for an efficient workflow. The cleaning solution should go into bucket 1 and it will provide deep cleaning of the items on the production line.
Bucket 2 provides the first rinsing station, getting rid of some of the dirt and chemical residue left over from using bucket 1. Finally, bucket 3 serves as a second rinsing station to make sure that all the dirt and residue is removed before moving onto the next step.
Step 2: Fill Your Buckets
Filling each of the 5-gallon buckets with 4 gallons (15 litres) of reverse osmosis water is an essential step to successfully clean out your garden and keep it looking beautiful. This quantity is purposely deep enough to be able to dip and wash entire branches at a time while still avoiding an unwanted splash of water onto nearby areas.
Once the buckets of water are full, you can then add some additional items to create a cleaning solution. Pour in ¼ cup of lemon juice and ¼ cup of baking soda into one of the buckets and stir thoroughly until everything is mixed together well.
This solution will help to disinfect, sanitize, and remove dirt from the leaves and branches better than plain reverse osmosis water would by itself. Completing this step will give you a reliable cleaning solution for caring for your plant's foliage and leaves.
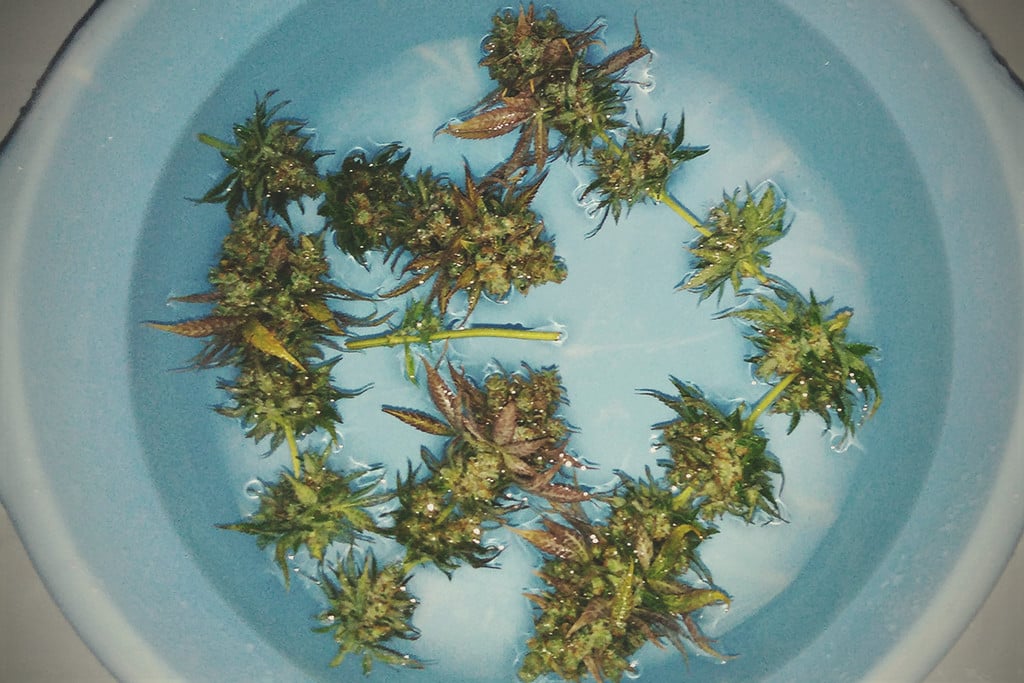
Step 3: Initial Dip
The third step in preparing a plant cutting for propagation is to dip the initial branches in the solution. This is typically done using bucket 1 which contains a special liquid solution for propagating plants. Begin by carefully selecting and gathering a branch with buds growing from it, taking care not to break or damage the buds.
Step 4: First Rinse
The fourth step in the branch production line is to perform a first rinse. After a branch is taken off of the cutting machine, it needs to be moved down the production line to bucket two that has been filled with water. Once submerged, the worker needs to move the branch around for 30 seconds in order for any remaining debris or solution to be washed away.
Having a thorough rinse is extremely important because any excess substances left on the branch will impact the quality and life span of the product. If there are any particles left on it, they could cause issues such as discoloration or deterioration over time.
Step 5: Second Rinse
The final step in the entire process of cleaning and preserving flowers and herbs is a second rinse. This rinse takes place in a separate bucket of clean water, which should be stirred gently for thirty seconds before beginning the process. The aim of this rinse is to remove all remaining contaminants, dirt particles, and any residual solution that may still cling to the flowers or branches.
Step 6: Start Drying
When it's time to start drying your cannabis, first be sure that the plant material has been thoroughly washed as any remaining moisture can result in mold or mildew. Place your dried material in a dark room with plenty of air circulation so that it can effectively dry out. Be sure that the relative humidity stays between 45% and 55% - if it’s too high, you risk mold growth; too low and your buds will dry out slowly and evenly.
After around 12 days of drying, you'll be ready to start the curing process which is an important step for further enhancing the flavour and quality of your buds. Curing marijuana involves storing it in sealed containers under ideal conditions (darkness and 65-70℉) for at least two weeks.
During this time period, the buds continue to break down which leads to a smoother taste. After the curing process has taken place, you’ll have some delicious and high-quality cannabis ready for you to enjoy!
Final Thoughts
It’s easy to think of bud washing as an unusual and obscure process, but the truth is that it makes a lot of sense when you start to look at it. While we generally wash fruits and vegetables before we eat them, why wouldn’t we do the same for something we ingest or smoke like marijuana?
Sure, the washing adds a bit of time onto the process, but after taking a glance at the bottom of the bucket once you’re done rinsing off your buds you can rest assured that any extra strain on your time was worth it.