The Ultimate Cannabis Fluxing Guide
When considering cannabis plant training methods, familiar techniques like Low-Stress Training and topping likely come to mind. However, an age-old practice called fluxing has recently gained traction among cannabis cultivators, thanks to its remarkable ability to boost yields and promote robust plant health.
Developed by a renowned home grower, this innovative approach is making a splash in the cannabis farming community. In this article, we'll delve into the world of cannabis fluxing, exploring its intricacies and unveiling the secrets behind this transformative technique.
History of Fluxing Cannabis Technique
The fluxing technique, created by grower Light Addict, is a captivating cannabis growth method that many producers use. It involves a split occurring at the base of the plant between two main branches and has similarities to a manifold.
This process is distinct from manifolding in that it changes the entire subsequent process. As described by Light Addict himself in his book about this subject, there are numerous tips and procedures for fluxing as well as instructions for effective cannabis grafting. Additionally, patients performing this method on regular plants should wait until they reach the third node before proceeding.
More: Difference Between Male and Female Cannabis Plants.
Understanding Cannabis Fluxing
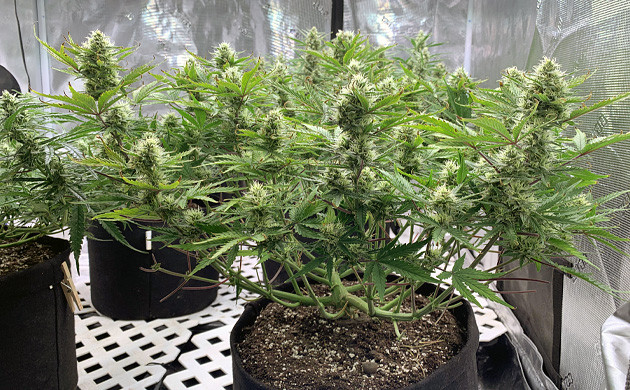
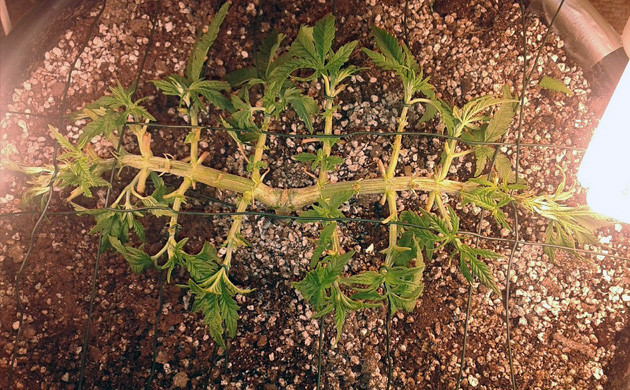
Fluxing is a helpful technique for cannabis growers looking to maximize the potential of their harvest. It involves spreading out the two main stems of each cannabis plant early on in its development to create a broad and flat shape with many evenly spaced sites for bud growth.
This allows each location on the plant an equal amount of light penetration and airflow space, ensuring every single limb has been given the same opportunity throughout its growth process. On top of that, Light Addict states that this process can be extremely beneficial during the vegetative stage because it gives you full control over the development of your plants.
Fluxing may not always be necessary but it’s certainly worth considering when growing multiple cannabis plants simultaneously—it could mean more successful buds in the result!
How And Why Should You Flux Cannabis?
Fluxing is a type of pruning technique used primarily to increase yields in cannabis. In fluxing, the lower branches are removed from the plant allowing it to concentrate its energy on the higher, more productive branches. This has many benefits for yield and overall plant health.
Not only does this make sure that all parts of a plant have sufficient access to light and airflow, but it also promotes an even canopy with equal amounts of light reaching each branch. It reduces overall stress on the plant which makes it healthier and less likely for diseases to take root.
The other advantage of fluxing your cannabis plants is an increase in yields due to an even growth pattern. By removing some of the lower, less productive branches, a grower can ensure that their plants focus all their energy on reaching up towards the light and producing buds instead of using energy needlessly spread throughout the plant.
More: What is The Difference SOG vs SCROG?
Benefits of Fluxing Cannabis Plants
Fluxing cannabis plants is an innovative technique for maximizing yields and promoting strong root development. Because the number of top buds is increased, it decreases larfs and other wasted energy. By providing additional light sources close to the canopy of your plants, fluxing helps spread out the plant's energy more evenly which results in larger yields and more dense buds.
There are also great benefits when growing indoors, as fluxing allows you to develop outwards rather than upwards, giving you a naturally tall garden with denser buds that can fill out your cannabis space. Not only does this method help promote better regeneration rates; but it presents an excellent way to get the most out of any single grow space.
The other advantage to fluxing is that it is an environmentally friendly way of growing, in terms of both energy efficiency and water conservation. By concentrating light on certain parts of your garden at different times, you can strategically place the lights farther away from where unnecessary energy loss could occur.
This reduces the amount of electricity being consumed by helping balance the temperatures in each section of your garden, allowing for healthier growth and yield without spending too much on utility bills.
Cons of Fluxing Cannabis Plants
Flipping cannabis plants has become an increasingly popular process that can be used to create fantastic and high-quality yields. However, there are a few drawbacks to the procedure that need to be considered before diving in.
The most basic of these is effort. Fluxing cannabis involves significantly more effort than the Sea Of Green or manifold method which makes it a tough option for those without a great deal of time or energy available. This means it's not quite as manageable or convenient as other options when it comes to managing your plants.
Another issue present with fluxing cannabis is genetics. Only photoperiodic plants can be utilized in the process and different developmental periods must also be taken into consideration to ensure the proper flowering cannabis stage is attained, otherwise, you risk stunted growth or deficient yields in some cases.
Furthermore, you must have complete control over when flowers decide to emerge from the plant by carefully monitoring temperature, lighting, CO2 levels, and other important factors along the way. All this means that you need quite a bit of skill and knowledge about farming to successfully utilize this method properly.
Cannabis Fluxing vs Manifolding
Cannabis fluxing is the ideal cultivation method for those using small pots, both indoors and outdoors. It involves periodically pruning down the cannabis plant to be able to clean everything below the third node.
The two branches that remain are then held close to the growth medium and gradually tied down to lay flat. The process is repeated with every new shoot that sprouts from off the main stem of the plant. These side branches are then knotted and lowered into place so that they can spread out horizontally.
This approach produces multiple nodes of healthy foliage along the top layer of soil, which in turn improves airflow through the root system during flowering stages.
More: How To Get Big Cannabis Yields Outdoors.
Required Cannabis Fluxing Equipment
For optimal cannabis growth, many have turned to Light Addict's fluxing approach, which involves using green twist ties to establish a grid over the canopy. To efficiently carry out this method, you'll need an adequate supply of green twist ties.
Once your grid is established, each grid square will receive its branch to provide full and even light coverage. For particularly large cannabis plants or crops, it’s best to utilize a large smart pot that comes with pre-existing holes for easy attachment of the twist ties.
Fabric pots like smart pots let air flow through more easily than other types of container grow systems resulting in larger and healthier plants. The holes allow for easy insertion of the twist ties and let growers keep their trellis tight so that energy goes into flowering rather than being taken away trying to stay upright.
Smart pots are a great choice for cannabis fluxing because they come already equipped with what you need; no extra hardware is necessary!
More: How To Grow Cannabis Indoors.
A step-by-step Fluxing Cannabis Procedure
Fluxing, also known as mainlining or manifolding, is a cannabis training technique that promotes even canopy growth and optimizes light exposure for higher yields. It involves creating a symmetrical plant structure with multiple main colas (flowering sites) by pruning and training the plant. Follow these step-by-step instructions to excess flux your cannabis plants:
Step 1: Choose the right strain Select a strain that responds well to training techniques, such as fluxing. Indica-dominant and hybrid strains are generally more adaptable to this method than Sativa-dominant strains.
Step 2: Prepare your plants Start with a healthy cannabis plant that is at least 3 weeks old, with 5-6 nodes developed. Make sure the plant is growing in a suitable medium, and you have the necessary tools, such as pruning shears and soft plant ties.
Step 3: Top the plant Using clean, sterilized pruning shears, top the main stem right above the 3rd node. This will promote the growth of two primary branches and remove the apical dominance of the main stem.
Step 4: Remove the lower growth Prune away the lower branches and leaves (first and second nodes). This will direct the plant's energy to the two main branches that will serve as the foundation of your manifold.
Step 5: Train the primary branches Allow the two primary branches to grow for a few days. Then, gently bend them down and outward, securing them to the edge of the pot or the growing medium with soft plant ties. This creates a T-shape and encourages the plant to grow horizontally.
Step 6: Allow secondary branches to grow Once the primary branches are trained, let the secondary branches grow from each node on the primary branches. These secondary branches will become the main colas of the plant.
Step 7: Top the secondary branches When the secondary branches have developed at least 3 nodes, top them right above the 3rd node. This will create two new growth tips on each secondary branch, increasing the total number of colas.
Step 8: Remove unnecessary growth Prune away any lower branches, leaves, or growth tips on the secondary branches that won't receive adequate light. This will direct the plant's energy to the main colas.
Step 9: Train the secondary branches Use plant ties to spread the secondary branches evenly, creating a symmetrical canopy. This will maximize light exposure and adequate ventilation around the plant.
Step 10: Maintain the canopy Continue to monitor the plant's growth, adjusting ties and removing any unnecessary growth as needed. Ensure that all colas receive equal light exposure.
Step 11: Flowering phase Switch your light cycle to 12 hours on and 12 hours off to induce flowering. Monitor your plant for signs of nutrient deficiencies, pests, or diseases and address any issues promptly.
Step 12: Harvest Once the buds have reached their peak ripeness (indicated by the color of the trichomes), harvest the plant by cutting each cola off the main branches.
Following these steps ensures a successful fluxing cannabis procedure, resulting in increased yields, potent buds, and thriving plants. Cultivators can now enjoy the benefits of this innovative method for improved harvests.
Essential Tips Before You Start Fluxing Cannabis
Before you begin fluxing your cannabis plant, it is essential to keep a few tips in mind. First and foremost, start the process while your plant is still young; week 3 or 4 of veg is a great starting point. To ensure healthy growth during the first few weeks of vegging, keep the plant under 24-hour light - this will help the fluxing process once it begins.
Additionally, make sure not to wrap green twist ties too tightly around branches as they can cause damage over time. These two simple tips will help ensure your cannabis plant health gets off on the right foot. Another piece of advice before fluxing is to pay attention to the time of day when you begin the manifold procedure. The process works best if executed in low light periods (think early morning hours).
Also, try to observe which branches are growing faster and slower so that you can begin with those that need the most support before reaching out to the others. Following these suggestions will help you ensure that your plant undergoes fluxing in its optimal environment, leading to bountiful harvests!


 Français

